When we talk about dump a MySQL database, we refer to a very simple operation: starting from the tabular representation of the data (and any references that bind them) we move on to export everything in a way faithful to the original in text format (with MySQL syntax), that is, we are making a complete backup of the database of our site to be reused in case of need.
What is a MySQL dump?
The dump operation of a database ( official documentation ) allows the user to save all the contents of the tables in a .SQL file , for example, which contains the queries that allow the content to be “rebuilt” elsewhere.
How to DUMP a MySQL database
- First of all, access PHPMyAdmin with your username and password: obviously these credentials must be the same ones associated with the database you want to backup;
- Click on Export: usually the default settings are fine to perform a dump correctly.
- Make sure you are exporting the whole database, and not just some tables of the same: to do this, just select the db you are interested in from the drop-down menu on the left.
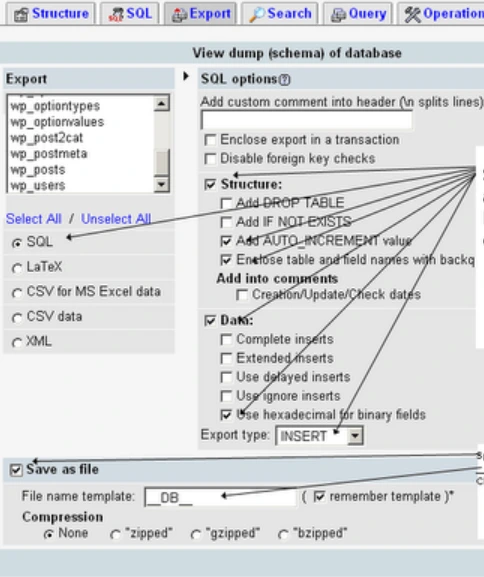
- As export format select SQL, and then be sure to select â € œAdd AUTO_INCREMENTâ €, INSERT as export-type and all that I have reported in the screenshot below. To be on the safe side, you can still check all the boxes: I usually do this and things are fine too (tested on WordPress and Drupal, so far).
- There is little else to do, except make sure you have selected “SAVE as File” and file name template usually “__DB__”: clicking on GO, PHPMyAdmin will generate a file to download .SQL, which you will have to keep aside for when you restore.
In this screenshot the Export button is highlighted:

Restore the saved database
Restoring the database at a later time (you will need it in the most disparate or desperate cases: corrupt site or hacker to restore, installation of an old version of the site, migration of the site from one hosting to another and so on) passes through the import on the destination site in PHPMyAdmin of the .SQL dump file that you have downloaded: to act in this direction, the procedure is as follows.
- Initially, from the PHPMyAdmin screen, click on the table that says â € œSQLâ €;
- Select the backup you created previously (file with .SQL or dump extension);
- Click on â € œGOâ €: at the end, you should have a dump confirmation message, which will appear at the top of the next screen.
This procedure can be used on any hosting service with MySQL database included.

