Do you have several old cassette tapes and would like to digitize them? Although this type of analog media has a special charm, it is likely that they have been in your possession for several years. In the end, it is only a matter of time before the magnetic strips of the tapes deteriorate and stop working. To prevent this from happening, the best you can do is digitize the analog signal. In today’s post, we explain step by step how to convert the sound of an audio cassette into an MP3 file in a comfortable and simple way. Let’s go there!
Necessary elements
To successfully carry out the digitization process of an analog cassette, you will need the following components:
- A cassette converter with a USB port.
- A USB pendrive.
In our case, we have used a Mypin cassette converter since it is one of the best valued in its field, although, on Amazon, you can find many more converters. Most have a price of around $30, and their operation is practically identical.
How to Convert an Analog Cassette Signal to Digital Audio (MP3)
For the cassette converter to work, you will also need a pair of AA batteries. If you do not have batteries at hand, you can connect the converter to a PC through the power port that you will see on one of the sides of the device.
Step # 1: Plug in headphones and adjust the volume
The work of the converter is very simple. Instead of taking the sound out of the cassette through the headphones, it exports it to a USB pendrive. For this reason, it is important that before starting the recording to the USB, you regulate the playback volume. If the volume is very low, you will hardly hear anything, and if it is too high, the noise will affect the quality of the audio track. Pretty logical, right?
To make sure that the playback volume is correct, the first thing you will do is put the tape in the cassette converter. Connect headphones to the 3.5mm minijack port on the side and press the “Play” button. Take the time you need to regulate the volume.
Step # 2: Connect a USB flash drive
Now that the volume is regulated plug a USB stick into the cassette player’s USB port. The converter only supports flash drives in FAT32 and exFAT format.
The Mypin cassette player that we are using for this tutorial performs conversions at 128 Kbps, which means that on an 8GB pendrive, you can store around 2,000 MP3 songs. Therefore, if you use a pendrive of at least this capacity, you will have more than enough space to digitize several dozen cassettes.
Step # 3: Start the scanning process
When the cassette converter shows a green LED, that is a sign that it has recognized the USB, and you can start converting the audios from the tape to MP3.
- Hit the “Play” button located on the top of the device to start cassette playback.
- On the side of the device, click on the button with a circle and a pause symbol to start recording to USB.
- When recording is in progress, the green LED light will begin to flash.
- When you want to stop recording, click on the record button again. The green light will stop flashing.
A file in MP3 format will automatically be generated with the piece of tape that you just played inside the folder on the USB.
When you finish digitizing one of the sides of the tape, you can change sides automatically by leaving the “AUTO-REVERSE” button activated (located on the top of the device) or by clicking on the “DIR” button to change sides manually.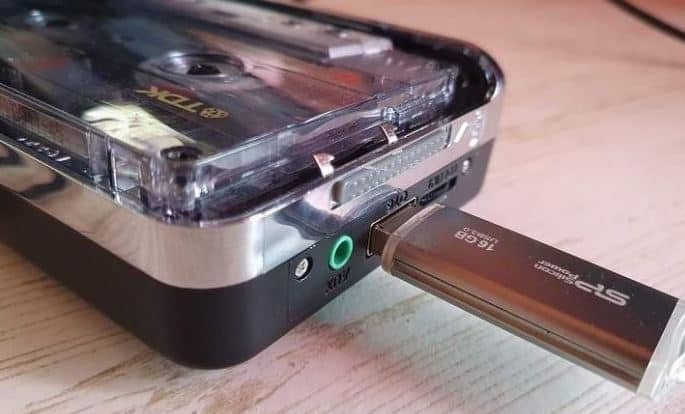
Some details to keep in mind
The cassette converter has two modes of use: manual and automatic. By default, the recording is done in manual mode. To activate the automatic mode, click on the FFW button that you will see below the record button and keep it pressed for a few seconds until the LED shows a blue light.
In automatic mode, the converter will record all songs in individual MP3 files. In manual mode, you can separate the songs by pressing the FFW button when the song ends.
The Mypin converter also allows you to convert audio from other devices to MP3, such as CD players, mini disk, radio, or any other device with audio output. To do this, connect the external device to the AUX input of the headphones using the cable with input and salute minijack that comes inside the Mypin package.
After trying several cassette tapes, the truth is that the result is the most positive. Of course, I would highly recommend checking the volume and doing a few tests before recording the entire cassette. It is the best way to ensure that you get a digitized file with the best possible quality and the least amount of noise.
Finally, if you see that the green light does not blink when you start recording, that is a sign that the pendrive is not compatible. Check the format of the pendrive or try another USB.
